
2018 Honda Gold Wing
|
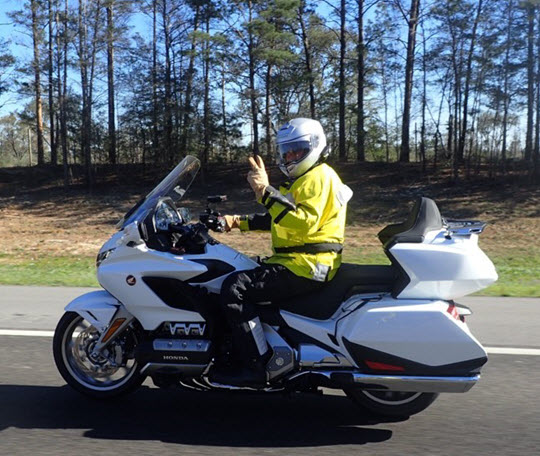
So I did it, I bought a new 2018 Gold Wing hoping the changes Honda made are improvements over the previous Gold Wing's. I had sold my last Gold Wing in 2016 and bought a BMW RT because the Gold Wing was far behind the times when it came to improved safety features like traction control. So what I really like about the new Gold Wing is the new safety features like traction control and ride modes. The combined ABS brakes are also very nice. These new safety features go a long way in helping keep the rider upright and safe. If Honda would not have added these features I would not have bought a new Gold Wing. I will be continuing to update this webpage with information about my new 2018 Honda Gold Wing and the "improvements" I make over time. |
|
First BBG On A New Gold Wing
2018 Gold Wing Information
I am starting to get farkles installed on my new Gold Wing and this webpage is where I will try and provide the how and why I did what I did.
The new Gold Wing does have a 112 MPH speed limiter and it gets there pretty quick. There was a lot of throttle still available at that speed.
When I first bough the Gold Wing I took all of the plastic off so I could install many of the farkles I wanted. I ran a few wiring harness also to the front and rear of the Gold Wing to use for AUX lights and other electrical farkles.
Some of the photos are not the best but they were taken in the heat of the battle. :)
Some of the farkles I have added so far include the following with links.
-
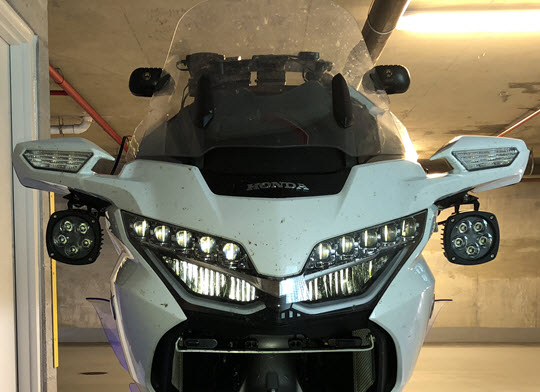
Honda Fog Lights – Hardwired, always on even when high beams on
-
Honda Luggage Rack
-
Honda Luggage Rack LED Brake Light
-
Honda XM Antenna
-
Honda 12 Volt Plug
-
Honda Tall Windshield
-
Honda Lower Air Deflectors
-
KAWELL Universal 2 lead LED Light Bar Wiring Harness Kit - 40 Amp Relay
-
Skene IQ-260-D Rear LED Brake Visibility Controller With Decelerometer
-
RCU Designs Dash Shelf For BMW
-
Fuse Block In Left Saddle Bag
Some Thoughts
Some of my initial thoughts on the new Gold Wing are.
The Good
-
Great power – faster than the BMW RT up to 100 MPH – 0 to 100 was QUICK even in Tour ride mode
-
Traction Control
-
Ride Modes
-
Electric Windscreen
-
DCT Automatic - Yea I like it!
-
Large 7 inch navigation display
-
LED headlights
-
Larger rear tire to handle the heavy loads
-
Great suspension – worked as advertised – very smooth
-
The handling is easy and the motorcycles goes where you point it
-
Great 7 speed automatic gear box, nice paddle shifters
-
Mirrors are in great position and you can see behind you very well Stereo was loud enough at high way speeds
-
Cruise worked very well with no lag when engaging as previous gold wings
-
40 MPG indicated with onboard computer – nice new onboard computer
-
Side stand down indicator was nice along with luggage open indicator
-
RPM’s lower in top gear – 2800 PM at 80 MPH – about 600 to 700 RPM’s less than current 5 speed
-
Engine is instant start – kind of weird
-
XM weather radar overlay on navigation screen
-
Apple CarPlay - yea it's not bad
Not So Good
-
Engine is much louder – I liked the current wing that was quieter
-
Wind protection is not good – will need larger wind screen and air deflectors
-
Steering is very sensitive for first time riders – almost dropped the bike turning out of the parking space
-
Still some navigation commands you can’t use while moving - but better
-
Poor limited navigation system software
-
No built in intercom
-
No hardwire helmet headset cord
-
You have to open a pocket which may be locked to get to the gas lid opener which will be a pain in some circumstances, if you do not have the key FOB you cannot open pocket
-
Small luggage capacity in saddle bags
-
Less room to store stuff
-
Small gas tank – once you add the bigger windscreen and air deflectors I am sure MPG’s will drop
-
Top speed limiter of 111.8 MPH - It is real can't go over 112 MPH
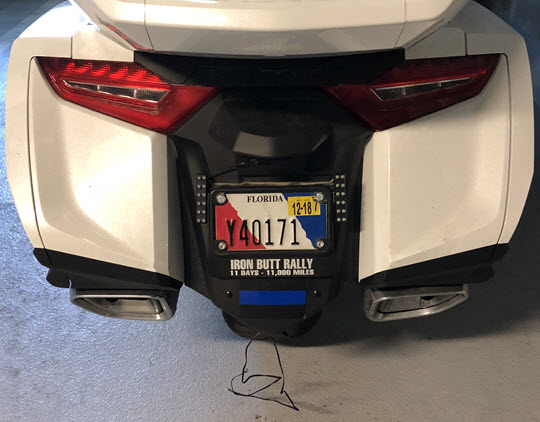
Time For New Tires
It was time for new tires so I can be ready for any LD ride that may come up. I do not like to wait until the tire is completely worn out before I change my tires. Usually by the time the tire tread depth is around 3/32 I put on new tire.
So now I am at 14,000 miles on my new Gold Wing and I felt it was time to put on some new rubber.
Honda OEM Parts
When I purchased my new Gold Wing I had the dealer install some Honda OEM parts that were currently available including the luggage rack, LED brake light for the luggage rack, XM antenna, tall windscreen and the 12 volt accessory plug. I installed after picking up the Gold Wing the Honda fog lights, lower air deflectors and the second USB cord in the left saddle bag.
Honda XM Antenna
I found after I had the dealer install the XM antenna at a great cost of labor and OEM XM antenna ( $250 parts & labor ) that you could buy a XM antenna for $30 and install it yourself anywhere on the motorcycle you liked. Here is a link to where you can buy a compatible XM antenna: https://www.xm-radio-satellite.com/terk-xm-radio-xmicro2-magnetic-car-antenna/
Honda 12 Volt Accessory Plug
If I would have checked into the 12 volt accessory plug and the location it is installed I would not have bought it. I do not like the location of the plug as it is out in the open and can get in the way of your knees when riding./p>
Honda Tall Windscreen
The tall windscreen is just that tall. It is not much wider than the stock windscreen. It does offer some more wind / weather protection but is not really enough. There was no aftermarket windscreens available when I bought my new Gold Wing so I went with the tall windscreen. I will be replacing this with an aftermarket windscreen once I find the one I like. I really want a windscreen about 3 inches wider on each side.
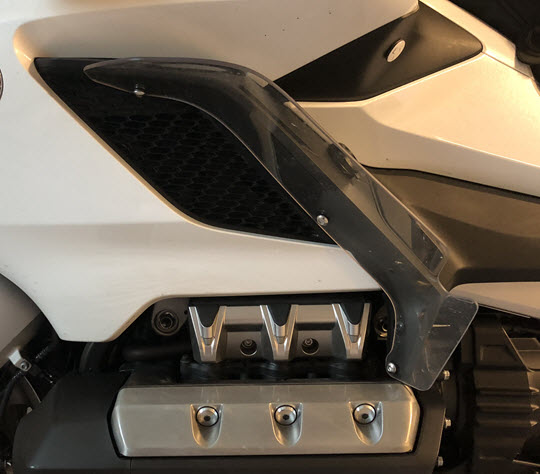
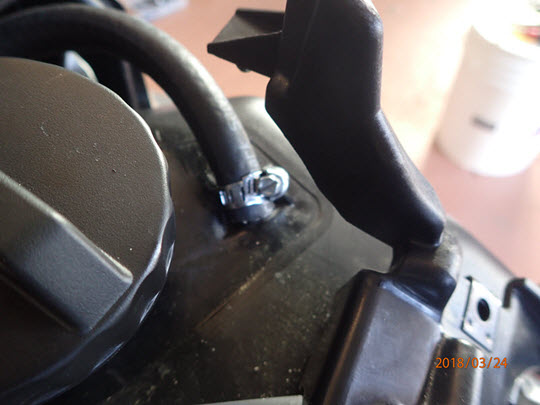
Honda Lower Air Deflectors
Since the new Gold Wing is narrower and has less leg protection from the wind and rain Honda designed lower air deflectors. I have them installed and they do offer more protection but the protection does not compare to previous Gold Wings.
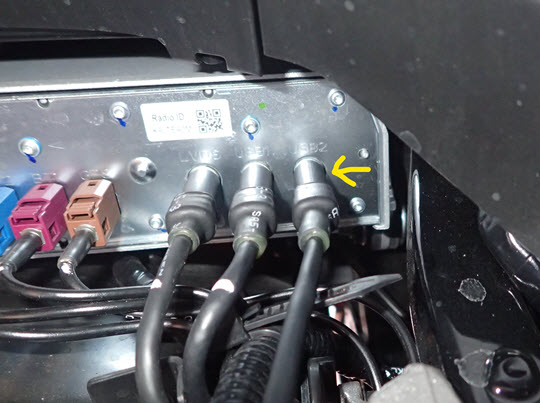
Honda USB Cord
Honda provided the ability to have a second USB cord ( a USB plug is also in the pocket in front of the seat on the Gold Wing Tour model ) connected to the radio system where you can attach a flash drive with music or even connect a device for charging. It is normally installed into the left saddle bag and that is where I installed mine. You could route the USB cord anywhere on the motorcycle you want as long has you have access to it. There is a rubber grommet in the upper front of the left saddle bag that you can route the USB cord through. The USB cords plugs into the radio under the passenger seat, see photo below.
Aftermarket Parts
Fuse Block
I tapped into the switched accessory power port on the Gold Wing's fuse box ( same as previous Gold Wing's ) to power my fuse block. I normally mount the fuse block under the left side battery cover but on this new Gold Wing there is not enough space for a fuse block there. I decided to mount my fuse block in the left saddle bag in the upper top corner. There are two rubber grommets in the left saddle bag and I removed one of those to route my wires through to the fuse block, I removed the other rubber grommet to run my second USB cord through to the radio under the passenger seat. I am sure there are better places like maybe the trunk but I chose the left saddle bag because I have other components installed in the trunk.
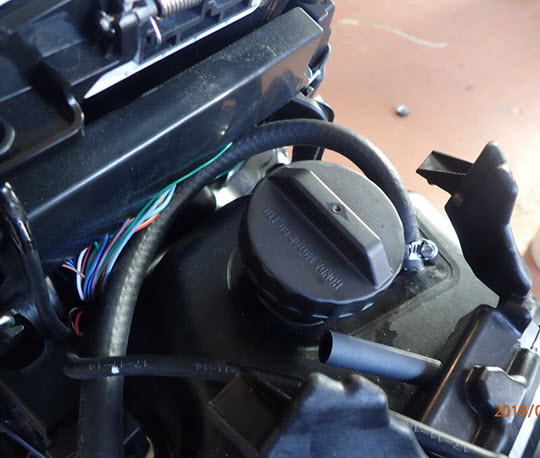
Skene LED Brake Light Controller
I have used Skene products for many years and like how they work and how I can program them from the brake lever after they are installed. Skene Lights has added a Decelerometer option to the IQ-260-D rear visibility systems controller that recognizes rapid deceleration and triggers the brake light flash sequence without the rider ever activating the brake lever. The IQ-260-D also has a unique conspicuity flicker and a flashing brake light functionality that you can program with the type of flashing you want when you apply the brakes.
I installed a brake light controller to turn the Honda LED Brake Light that I had installed on the luggage rack into a tail light and flashing brake light. The Honda OEM LED light is just a brake light and is not a tail light.
The IQ-260-D is a small device but it was not easy to find a place to install it. On past Gold Wings there was enough space between the inner and outer trunk lids to install the brake light controller but Honda has changed that and there is only about a 1/4 of an inch of space and not enough room for the IQ-260-D even in the hump area between the inner and outer trunk lids which used to have a lot of room to install light controllers. I ended up installing the brake light controller inside the trunk in the hump area for the passenger backrest. I had to drill a hole through the inner trunk lid to pass the wires through. I connected the Skene brake controller to the Honda trunk sub-harness that powers the Honda LED brake light. I also had to connect 12 volt power to the Skene brake light controller so I ran a positive wire the same place that the Honda trunk sub-harness is run.
Skene P3 LED Lights
Since I already installed the Skene IQ-260-D brake light controller installed I also added the Skene P3 lights on the rear of the Gold Wing and ran the wires up to the Skene IQ-260-D brake light controller in the trunk. So the IQ-260-D controls the LED brake light and the P3 lights making them both tail lights and flashing brake lights.
Skene LED AUX Light Controller
Skene has a nice AUX light controller called the IQ-275-Alert Intelligent Dimmer that also has a alert feature. This light controller enables your bike’s AUX lights to operate at reduced brightness when the high beam is turned off and at 100% brightness when the high beam is turned on. The IQ-275-A light controller allows you to program in a brightness level and then override it by turning on the high beam lights.
The alert feature will flash the AUX lights rapidly by just tapping your high beam switch twice within one second to initiate the brief, but highly conspicuous flashing sequence.
I mounted the IQ-275-A light controller under the seat and ran the wires to the AUX lights from there.
AUX Light Wiring Harness
I used a KAWELL Universal 2 lead LED Light Bar Wiring Harness Kit ( see above ) I bought off of Amazon to power my AUX lights under the mirror. I have used this wiring harness on many motorcycles over the last 10 years with great success. I ran the wire harness when I removed all of the plastic even though I did not know what, where or how I was going to mount the AUX lights. I assumed I would mount AUX lights under the mirrors like I normally do.
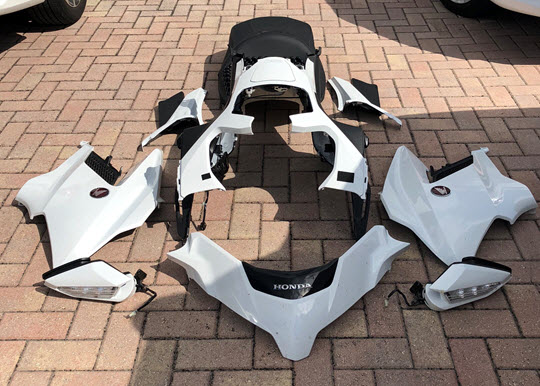
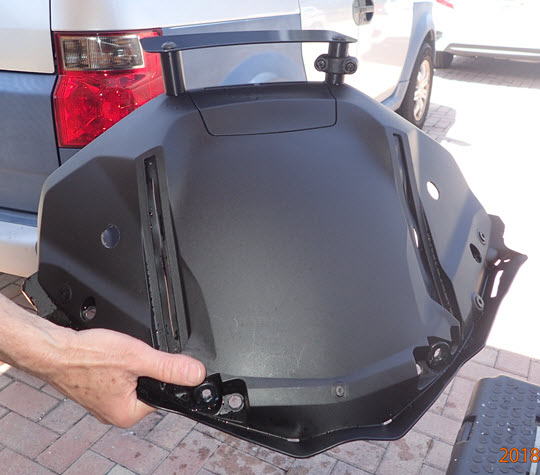
Gold Wing Plastic
Here is a photo of the plastic removed from the Gold Wing. There are a lot of fasteners attaching the plastic to the motorcycle. You have to be careful when removing the plastic because it is not just screws and pop rivets fastening the plastic to the motorcycle. There are many snap in fasteners that would be easy to brake off if you are not careful.
Can you say Darth Fader.>
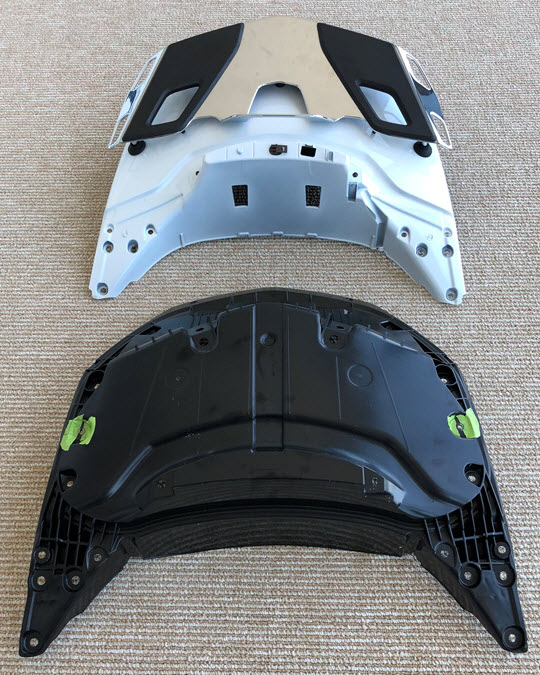
Trunk outer and inner shell with Honda luggage rack.
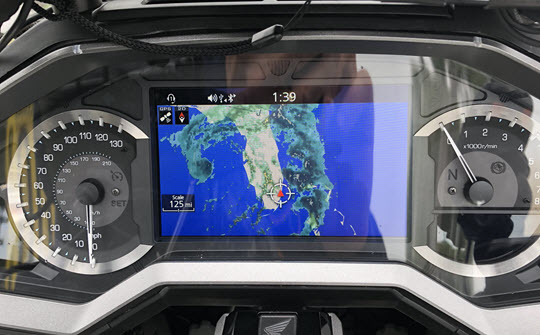
XM Weather Radar
Honda has made an improvement with the implementation of XM weather by adding the weather radar overlay on the main navigation screen. On previous Gold Wings with weather radar you had to switch to a different screen to see the weather radar.
LED Entry Lights
Honda designed into the new Gold Wing some of the features in their cars and one of those is what is called entry lights. the new Gold Wing has a key FOB that you keep in your pocket and when you walk up close to the Gold Wing with the key FOB in your pocket these LED entry lights light up. Honda sells a nice set of LED lights but they are $120. using the Honda installation instructions I found the wire connectors for the entry lights and I bought some waterproof LED lights at West marine for $6 and I installed them following the Honda installation instructions. These lights are very cool and a nice safety feature at night when walking up to the Gold Wing in the dark. They come on at about 2020 feet. They also turn on when you shut the Gold Wing off. See above for link to the LED lights.

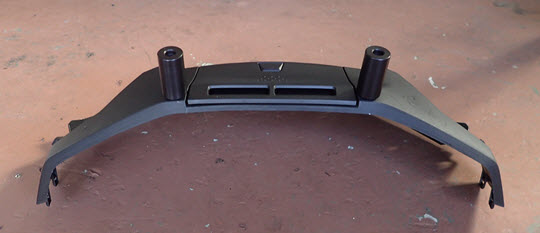
Dash Shelf Installation>
Here are some photos of dash shelf I installed. This was the same dash shelf I installed on my BMW RT. After looking at the dash on the new Gold Wing I thought the same dash from my RT would work so I ordered another one from RCU Designs. Here is a link to the dash shelf I ordered.
http://www.rcudesigns.com/ecommerce_023.htm
I had to remove all of the plastic from the front of the Gold Wing to be able to remove the dash. It was a little bit of work but it was worth it.
Dash shelf mounting post installed.
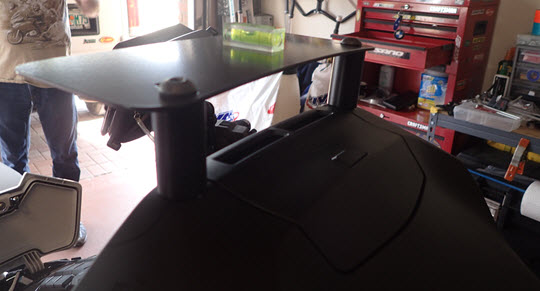
Dash shelf mounted and level.
I have RAM Torque Mounts on the dash shelf mounting post.
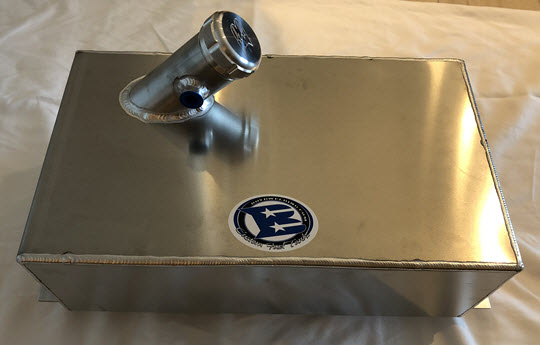
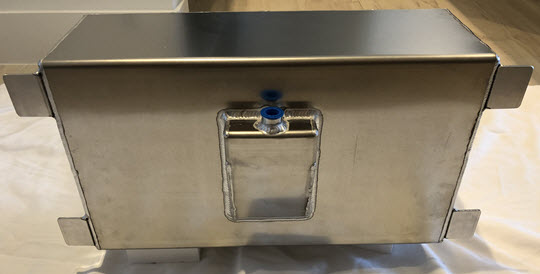
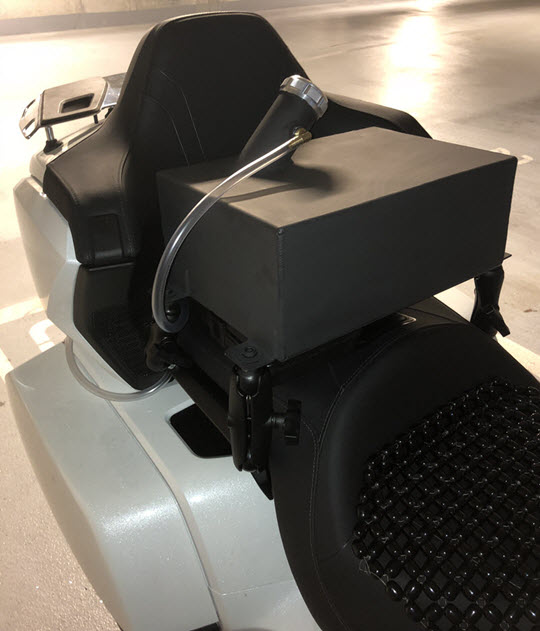
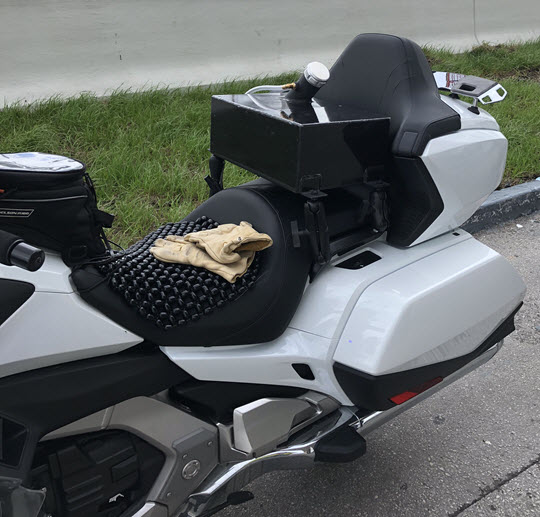
AUX Tank Installation
Here are some photos of my AUX tank and how I mounted to the new Gold Wing. The mounting using 1 1/2 inch RAM Balls and RAM Arms is a temporary solution until I can design a permanent mounting bracket. I wanted to get the AUX tank mounted so I could test the way the AUX tank will feed into the main fuel tank.
The tank is 16 inches long, 11 inches deep and 6.5 inches tall and it hold approximately 4.7 gallons. This is 1 gallon less than would be allowed for IBA Iron Butt Rally.
I designed the tank and sent the specifications to Boyd Welding in Florida who does a great job and has made many AUX tanks for LD riders.
I painted the AUX tank with engine flat black paint that is resistant to oil and gas and can withstand temperatures up to 2000 degrees.
I am using 3/8 inch fuel line as it will allow the fuel to flow quickly and I wanted to be sure it was big enough to not get a vapor lock in high temperatures.
Honda changed the previous Gold Wing fuel tank a lot, not just in the size but it also removed the fuel sending plate that was used to drill through to mount a brass fitting. With no fuel sending plate I had to find a new way to get fuel from the AUX tank into the main tank. I saw that Honda moved the tank vent from the fuel filler neck to the top of the tank ( see photos below ). I decided to try something the BMW riders have been doing which is to take advantage of the vacuum that is created when the fuel pump runs and is pumping gas to the engine. Normally the tank vent would allow air into the tank ( which is also the vent to allow air out of the tank when it gets hot and the fuel expends due to the heat.
The main fuel tank vent is under the plastic and you have to remove most of it to get to the vent. I removed the vent hose from the vent barb on top of the fuel tank and slipped on my 3/8 inch fuel line and installed a hose clamp to hold it tight. I ran the fuel line to the rear under the seat.
The idea is that when the engine is running and the fuel pump is pumping gas to the engine it will suck gas from the AUX tank instead of sucking in air through the vent. This way of draining the AUX tank into the main tank does work very well. Also if you open the gas cap on the main tank it will gravity feed fuel into the main tank because the AUX tank is mounted higher than the main fuel tank.
I took off the passenger handles and drilled holes in them ( see photo below ) to install the RAM balls and used a locking glue to hold them in place.
I designed the filler neck to point towards the side of the motorcycle that I stand on to fill the main tank so I do not have to walk around the bike or lean over to fill the AUX tank./p>
I designed a sump into my AUX tank.
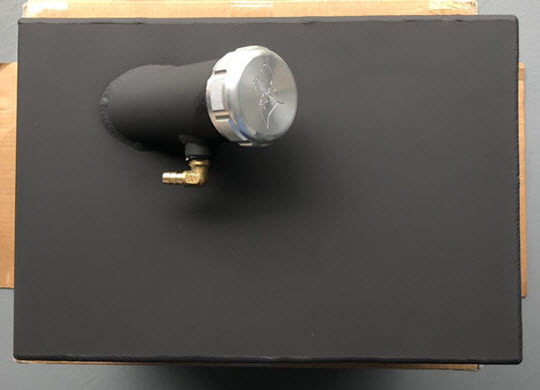
AUX tank vent installed into the filler neck.
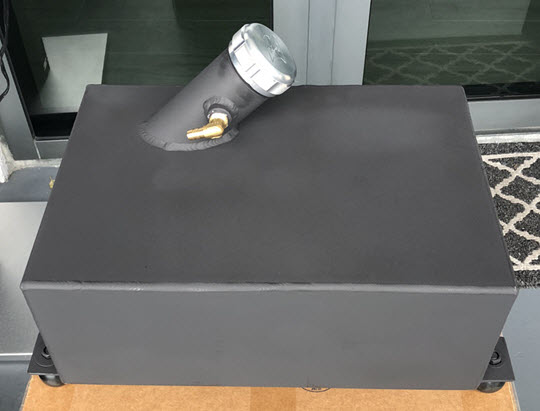
RAM 1 1/2 inch balls mounted with Loctite on mounting tabs.
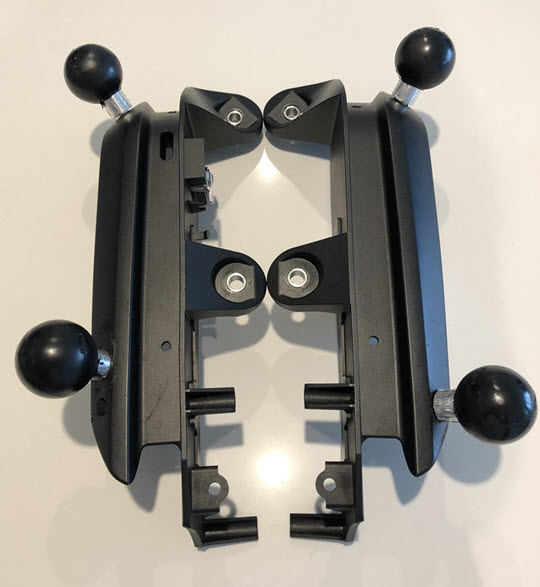
1 1/2 inch RAM balls installed in the passenger handles.
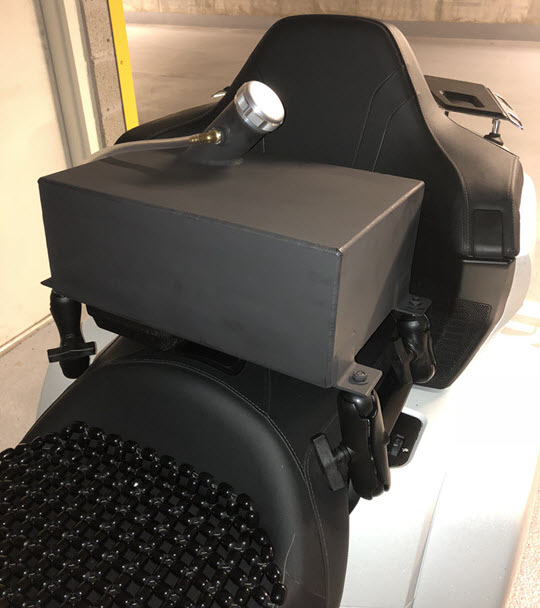
Mounted over the passenger seat with RAM arms.
6 inch RAM arms on the front of the AUX tank and 2 1/2 inch arms on the rear.
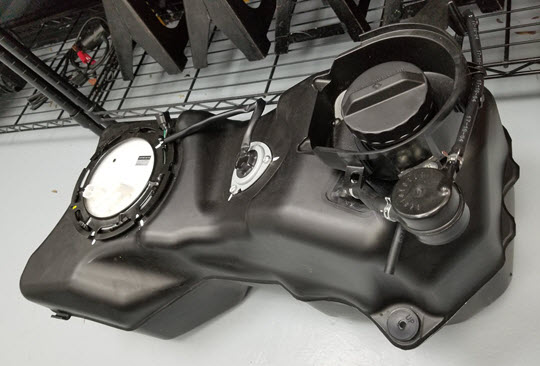
2018 Gold Wing Fuel Tank.
Fuel tank vent on right side of the gas cap.
Close up of the fuel tank vent where I installed my AUX tank fuel line.
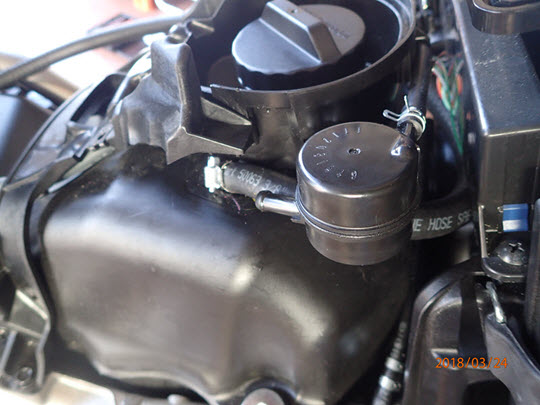
Photo from the other side of the fuel tank vent.
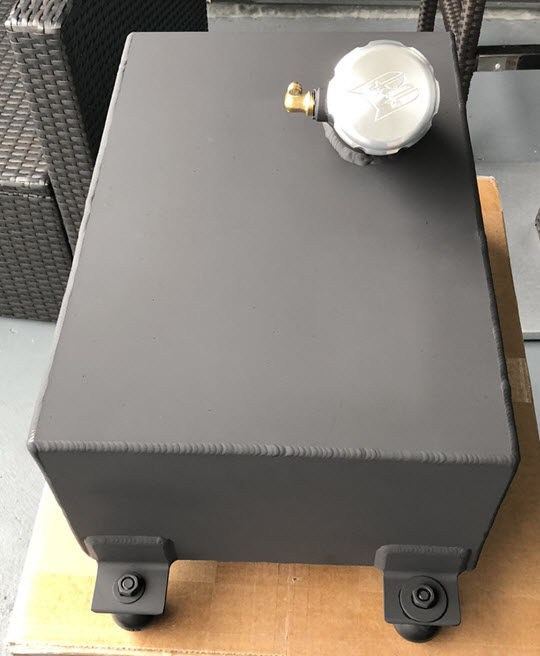
I covered most of the AUX tank with clear 3M protective film.

AUX Light Installation
I bought LED Rider LD5 LED AUX lights and mounted them under the mirrors.
I used the same mounting points for the AUX lights that Honda uses for the Honda Upper Air Deflectors. I followed the Honda instructions ( see below ) and removed the plastic pieces under the mirrors and drilled the two holes on each side that allow screws to be screwed in to the mirror mount.
I bought a couple pieces of Stanley door bracket metal at Home Depot and cut it to the length I needed and drilled to holes to align up with the two holes in the bottom of the mirror mount. I then bought the same number 10 screws to mount the AUX light brackets. I painted them black so they would blend in.

Places where to drill the holes in the plastic under the mirrors are pre-marked.
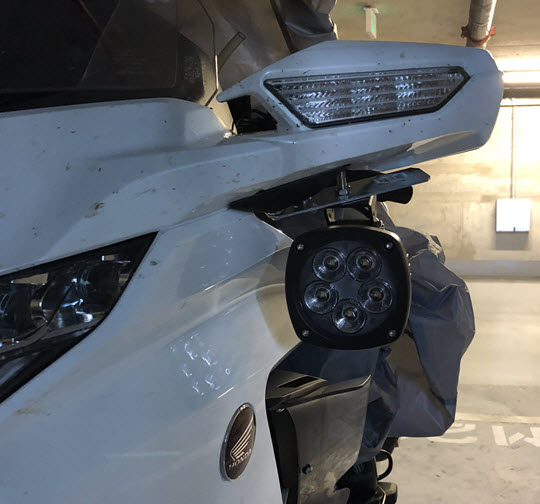
Initial install for testing the design.
AUX light mounts painted and installed.
Saeng Quick Scan Mirrors
I have been using Saeng Quick Scan Mirrors for 15 years and really like the rear visibility they give me. I mount them so they are at the height that I can just give them a "quick scan" to see what is behind and beside me. With these mirrors I can see vehicles right next to me so I have no blind spots. The mirrors mount with 3M VIRB tape that works well over triple digits.
The mirrors have a lot of adjustability to allow them to work on many different windscreens.
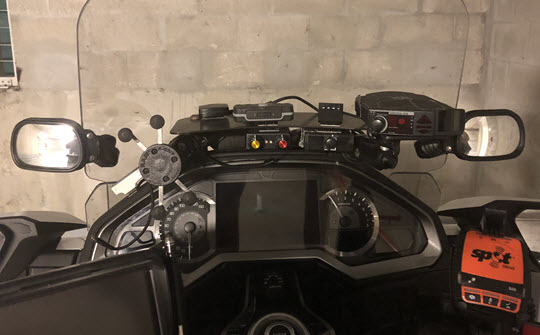
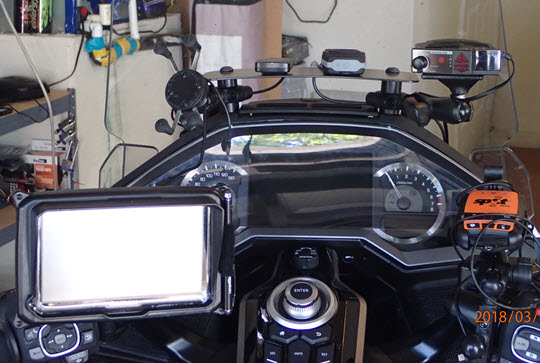
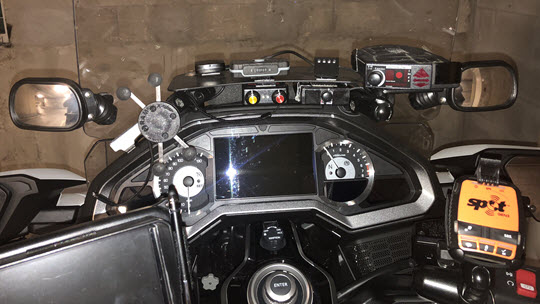
Dash Shelf Setup
With the RCU Design's dash shelf I have a place to mount many farkles that I like to have available to me while riding.
Some of the items I have on my dash shelf are Valentine V1, Valentine Remote Audio, Marc Parnes V1 LED alert, ALP GPS antenna, Warm-n-Safe Wireless Controller and RAM X-Grip mount for cell phone.
![]()
![]()
![]()
2018 Gold Wing
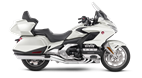
The 2018 Honda Gold Wing sets the standard long distance motorcycle riding.